I still had some LED strips left over after my last project and they're perfect for mounting and lighting cheaply, if you don't mind programming a bit of hardware. My goal was to create a webpage that provided control to several strips with features like modifiable speed, colors, and animations. There would be one master controller that would wirelessly send commands to any number of nearby clients, which each had their own strip.
HackUTD
I had this project brewing in my head for a few weeks, but had a hard time fitting it into my schedule. When I heard about HackUTD, The University of Texas at Dallas's first major student Hackathon, I decided to take my idea and make it a reality in 24 hours of caffeine fueled coding. I went ahead and ordered a set of RF transmitters and receivers and took stock of my spare Arduino Pro Minis.When I showed up to the hackathon with my box of tools and supplies, I was pleasantly surprised to meet a few engineers from Texas Instruments who were there to promote their Launchpad microcontroller series, as well as some RF bi-directional communication shields. After making sure that there was a good WS2812 library for the Launchpad series, I decided to switch to their hardware, which they graciously provided free samples of.
At the event, I was open to finding partners and working in a group, but ended up completing it on my own.
Overview

Overall, this version of the design uses four microcontrollers: one master connected to a Node.js webserver, and three clients each connected to their own strip. This configuration allows for any number of nearby clients to be controlled from the same interface. The only limitation is that the master needs to be connected physically to the Node.js webserver, and that the clients need to be reasonably close to the master. If you only needed a single LED strip and didn't mind being tethered to the machine running your server, you could get away with using a single microcontroller.
The Node server is configured to serve the interface webpage and accept websocket connections through the Socket.io library. Then, it forwards received commands through a USB serial connection to the master controller using the node serialport library. They then get sent over RF to any listening devices and each client checks the message and echoes back if its own device ID matches the destination in the message. If the master fails to receive an echo from the client after a timeout period, it assumes that the message wasn't received and resends it a number of times before giving up.
Hardware
Overall, the hardware for this project is very simple and I didn't actually need to do any wiring.
LED Strips
I used the same WS2812B LED strips that I used in my previous project. These 5V strips have a single data line that is used to drive the entire strip. However, in order to keep costs low, this data line requires a custom 800kHz signal that needs to be bit-banged out in software, As a result, the hardware configuration is very simple, but the software requires a bit of work and a library to handle generating the output.
Pushing a frame out to the LEDs takes 100% of the Launchpad's processing power. During this period, the software is in a tight, timing controlled loop that manually pulls the output line high and low at the right frequency. Because the LEDs hold onto their last frame until a new one is received, the software can safely preform other tasks in between frames.
I used three LED strips in my project, one large 150 LED strip and two smaller 30 LED strips. The smaller ones were just powered over USB, while the larger had a dedicated 5V 2A power supply.
RF Communication
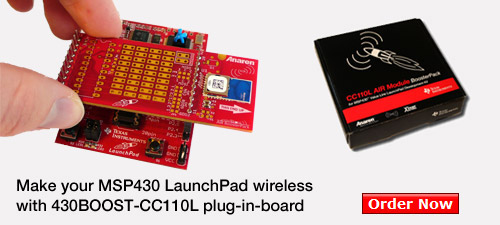
The microcontrollers communicate using Anaren's Launchpad RF Booster Pack. The included library easily handles communication, has four separate channels, and is resilient against noise. As a result, getting it set up was one of the easiest parts of this project.
The only issue that I had was reconciling the wireless library with the LED library. Both listening for wireless data and pushing out frames require 100% of the available processing power. To get around this, I just replaced the delay lines in between LED frames with a short timeout period of listening for wireless data.
Unfortunately, this also means that it's possible to miss a message while driving the LEDs. In order to make sure that each command is received by the clients, I took advantage of the two way communications and modified my protocol to require an echo back from the client. If the echo isn't received, the message is periodically resent a number of times.
Additionally, I had to test to find the minimum amount of time to keep the RF channel open while being able to reliably receive messages. I found that at any less than a 15ms timeout, messages started to drop.
Launchpad
Because the LED driver 3 bytes per connected LED, I was actually running into memory issues on the MSP430G2, which only has 512 bytes of memory. In order to get it to run, I had to trim down my serial communications and the memory footprint of each animation. Potentially, the library could be rewritten to implement on-the-fly animations that are algorithmically defined rather than buffered and pushed out. It would've been a lot of work though, and impossible to do within time constraints.
Communication Protocol
Currently, there are two communication formats: one for the master to send to clients, and one for the clients to use while echoing back. The content of the first byte(DESTINATION_ID) determines which message type is being used. The master has a device ID of 0, while the clients increment from 1 to 255. Currently, the protocol only supports commanding LED strips, but it can be extended for controlling other types of devices.
The computer running the Node.js server accepts websocket connections from users of the webpage that it serves. The graphical webpage easily allows the user to select one of the three LED strips, choose an animation, and select the speed and color of the animation.

When the user clicks "Send", it emits a message over the websocket connection with a byte string that represents the values selected. The server just forwards these bytes over serial to the master controller. Overall, the server is very simple and just serves a webpage and acts as a websocket to serial forwarder.
Code
All of the code is open source and posted on my GitHub.
Remarks
With every project I take on, I try to incorporate and learn about something new. For this project, I got to use RF communication, design a two-way protocol, and control the entire circuit from the internet, and I got it all done in twenty-four hours!
Overall, I'm pleased with my results, although I wish that I documented my process more thoroughly. You might've noticed that this post describes the final design moreso than the process, and that's mostly because the process was so rushed. As I go forward and embark on more projects, I'm going to try to write these posts alongside my construction. Hopefully that will let me capture my problem-solving methods and help any readers with their projects.
If you have any questions or comments, feel free to comment below or join the discussion on Reddit!
No comments:
Post a Comment